Appendix B
Authentication
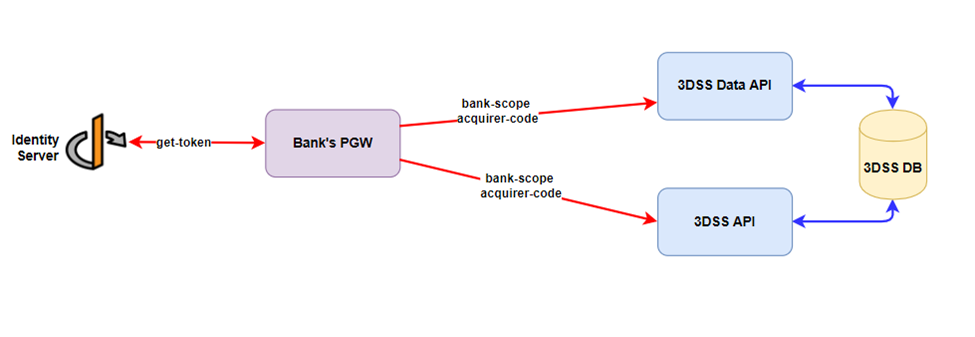
This authentication is to add another security layer to the 3DS Server and 3DS Server Data APIs. So, all clients who wishes to access above APIs need to get a token from the identity server and then it will authorize the access to the 3DS Server APIs.
As background, the OAuth 2.0 Authorization Framework [RFC6749] and OAuth 2.0 Bearer Token Usage [RFC6750] specifications provide a general framework for third-party applications to obtain and use limited access to HTTP resources. They define mechanisms to obtain and use Access Tokens to access resources but do not define standard methods to provide identity information. Notably, without profiling OAuth 2.0, it is incapable of providing information about the authentication of an End-User. Readers are expected to be familiar with these specifications.
OpenID Connect implements authentication as an extension to the OAuth 2.0 authorization process. Use of this extension is requested by Clients by including the OpenID scope value in the Authorization Request. Information about the authentication performed is returned in a JSON Web Token (JWT) [JWT] called an ID Token (see Section 2). OAuth 2.0 Authentication Servers implementing OpenID Connect are also referred to as OpenID Providers (OPs). OAuth 2.0 Clients using OpenID Connect are also referred to as Relying Parties (RPs).
Please refer to below link for more details: https://identityserver.github.io/Documentation/docsv2/overview/terminology.html
Authorization Code Flow Steps
The Authorization Code Flow goes through the following steps.
● Client prepares an Authentication Request containing the desired request parameters.
● Client sends the request to the Authorization Server.
● Authorization Server Authenticates the End-User.
● Authorization Server obtains End-User Consent/Authorization.
● Authorization Server sends the End-User back to the Client with an Authorization Code.
● Client requests a response using the Authorization Code at the Token Endpoint.
● Client receives a response that contains an ID Token and Access Token in the response body.
● Client validates the ID token and retrieves the End-User's Subject Identifier.

You can either send the client id/secret combination as part of the POST body:
Request
| Field Name | Data Type | Format | Example | Description |
|---|---|---|---|---|
| client_id | string | Characters 200 | BANK_CODE | Unique Id given to the client to connect with Id server |
| Client_secret | string | longtext | /I5axWpgFGKETQBb9ct6i4wKZcKq4zQK8r65nL3H0u8= | Secret key of the client |
| grant_type | string | Fixed value | client_credentials |
POST /connect/token

client_id=client1&
client_secret=secret&
grant_type=client_credentials
...or as a basic authentication header:
POST /connect/token

Authorization: Basic <credentials>
Note: Credentials here means, is the combination of client_id and client_secret with base64 format string.
Response
| Field Name | Data Type | Format | Example | Description |
|---|---|---|---|---|
access_token |
string |
Characters 200 |
“BANK_CODE” |
Unique Id given to the client to connect with Id server |
expires_in |
number |
3600 |
The validity period of token |
|
token_type |
string |
Characters 250 |
"Bearer" |
The type of authentication token |
scope |
string |
Characters 200 |
"3dss_api" |
Possible values for BANK_CODE: 3dss_api -> To connect with 3DSS API bank-admin -> To connect with 3DSS Transactions and Merchant APIs. |
{
  "access_token": "eyJhbGciOiJSUzI1NiIsImtpZCI6IkQxNDlENEM2MzdDRjVCMTBFRTIwNDVGRjA2RTFDNzZCIiwidHlwIjoiYXQrand0In0.eyJuYmYiOjE1OTMxMDI2MjQsImV4cCI6MTU5MzEwNjIyNCwiaXNzIjoiaHR0cHM6Ly9sb2NhbGhvc3Q6NTAwMCIsImF1ZCI6ImFwaTEiLCJjbGllbnRfaWQiOiJvYXV0aENsaWVudCIsImp0aSI6IjRENzM1RUMxMkZEMjRDNTBFQTFCRjcwRjlCODQ5QjA1IiwiaWF0IjoxNTkzMTAyNjI0LCJzY29wZSI6WyJhcGkxLnJlYWQiXX0.0xott5jEBg_KDn_62iKDLJvD5CWpT_4BhyY4clXoRjUgCaJmnhQuyF0jEUNDPylPXQIz-BzsRdraLoXmdm4fF6HyLUcZ587dXfM_OUPup4RpHTCV5g1WuMU1PleEOu1FF7FepNAZ52XFK5JQl2NY2PikvzXNIeirieT7KBBTyQH2L9Rxe-_ZS4q7WFq4eIYIIt9ZhCGv7QP_B_4LcpkFiDZIOqU3ZxhvafMl44DeHkFj8cIunmDszJxghxPCqIi9KX37RLwrtKa0sO5r8lnq2itV7LZBPdGQPFYmRnIr9Nnys4ikUkp5qGIqyWWwsdsRtzKEBAxmssYAHAHlBetL1w",
  "expires_in": 3600,
  "token_type": "Bearer",
  "scope": "3dss_api bank-admin"
}
You can then require an access token by using the Authorize Attribute on one of your endpoints. To use the access token, simply attach it to an HTTP request, using the Authorization header. For example:
Authorization: Bearer eyJhbGciOiJSUzI1NiIsImtpZCI6IkQxNDlENEM2MzdDRjVCMTBFRTIwNDVGRjA2RTFDNzZCIiwidHlwIjoiYXQrand0In0.eyJuYmYiOjE1OTMxMDI2MjQsImV4cCI6MTU5MzEwNjIyNCwiaXNzIjoiaHR0cHM6Ly9sb2NhbGhvc3Q6NTAwMCIsImF1ZCI6ImFwaTEiLCJjbGllbnRfaWQiOiJvYXV0aENsaWVudCIsImp0aSI6IjRENzM1RUMxMkZEMjRDNTBFQTFCRjcwRjlCODQ5QjA1IiwiaWF0IjoxNTkzMTAyNjI0LCJzY29wZSI6WyJhcGkxLnJlYWQiXX0.0xott5jEBg_KDn_62iKDLJvD5CWpT_4BhyY4clXoRjUgCaJmnhQuyF0jEUNDPylPXQIz-BzsRdraLoXmdm4fF6HyLUcZ587dXfM_OUPup4RpHTCV5g1WuMU1PleEOu1FF7FepNAZ52XFK5JQl2NY2PikvzXNIeirieT7KBBTyQH2L9Rxe-_ZS4q7WFq4eIYIIt9ZhCGv7QP_B_4LcpkFiDZIOqU3ZxhvafMl44DeHkFj8cIunmDszJxghxPCqIi9KX37RUpdated 12 months ago
